How to use QR Codes for Event Check Ins
Automatically generate and use QR Codes to check registrants in for an event.
Event Hapily supports QR codes to streamline event check-ins. This feature allows event organizers to automatically generate personalized QR codes for each attendee, which can be scanned for easy check-in.
This article will guide you through the process of enabling QR codes, setting them up in the registration workflow, and using them during the event check-in process.
Step 1: Enabling QR Codes in the Registration Workflow

- Create/Update the Create Registration Workflow Action:
- Navigate to the "Create Registrant" action within your event registration workflow and select "Yes" for "Create QR Code?"
- If you do not have an existing registration workflow you will need to create one. See HERE for instructions on setting up registration workflows.
- Saving the QR Code:
- The “QR Code” is automatically saved to the Registrant record as a link. This link can be used as a personalization token to display the QR within email.

- The “QR Code” is automatically saved to the Registrant record as a link. This link can be used as a personalization token to display the QR within email.
Step 2: Embedding the QR Code in Emails

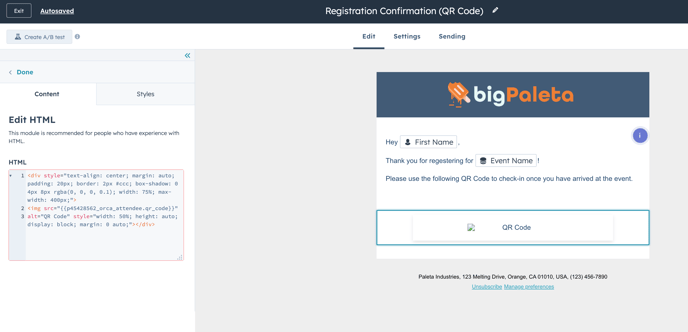
- Add an HTML Module to your email:
- Within your email template editor, add an "HTML - Email module"
- Copy the code below and paste it within the HTML Module Code Section
<div style="text-align: center; margin: auto; padding: 20px; border: 2px #ccc; box-shadow: 0 4px 8px rgba(0, 0, 0, 0.1); width: 75%; max-width: 400px;">
<img src="{{ contact.latest_session_qr_code }}" alt="QR Code" style="width: 100%; height: auto; display: block; margin: 0 auto;">
</div>
-
- Preview the email with a contact that has a QR Code to ensure the template is properly setup.
Step 3: Configuring Check In Settings in the event•hapily portal

- Accessing Check In Settings:
- Log in to the hapily portal then proceed to the "Check In Options" tab located under event•hapily.
- Select which property you would like to display on the confirmation page:
- You can select a property from the registered object to display beneath the attendee’s information during check-in.
Step 4: Event Check-In Process via QR Code
- Scanning the QR Code:
- During the event, event staff can scan QR codes using any mobile device. If the QR code is valid, the check-in process will be completed, and the system will display a confirmation message.

- After the contact has been checked in, event•hapily will automatically update the corresponding HubSpot Records to show their attendance status (click here to learn more).
- During the event, event staff can scan QR codes using any mobile device. If the QR code is valid, the check-in process will be completed, and the system will display a confirmation message.
- Re-scanning a QR Code
- If a QR code is scanned again, the system will notify the staff that the attendee has already checked in.

- If a QR code is scanned again, the system will notify the staff that the attendee has already checked in.
Still have questions? Email us at care@hapily.com!
