How To Manually Create A New Event with event·hapily
Discover how to create new events within your hapily portal using the hapily event and hapily session objects!
event·hapily allows you to sync over Zoom info to HubSpot as Events. But how are you supposed to set that up if you’re hosting a live event? Simple. You can manually create a hapily event and hapily sessions within the CRM!
Before we get started, it’s important to note the hierarchy of event·hapily objects:
- hapily event: Acts as the overarching object for an entire Event. Everything from individual activities to the total length of the Event can be found here.
- hapily session: Acts as an individual activity / meeting within an Event. Is used to check attendees in and track attendance.
NOTE: While a hapily event can have multiple associated hapily sessions (Needs at least one), a hapily session will only have one associated hapily event.
How to manually create a hapily event
If you’re familiar with HubSpot already, you’re in luck! Creating a new Event works the same way as creating any other HubSpot object. If you’re not familiar though, you can create one by:
1. Clicking Contacts > Custom Objects > hapily events in the top bar.
2. Clicking the Create hapily event button.
3. Filling out the fields in the resulting tab.
While the only required field is the Name of the Event, the rest of the fields featured here are important as well! Information such as the Start / End Dates, Event Length, or State / City will be important to effectively managing your Event. So make sure you fill out any that are vital to your success.
You’ll also notice two association fields at the bottom for Contacts and hapily sessions. You can ignore these two fields for now! We’ll cover how to create hapily sessions shortly. And the app comes bundled with workflow actions that will associate Contacts to Events for you.
How to manually create a hapily session
Now that the Event is created, it’s time to create a hapily session for it! Remember, Sessions are how you track attendance. So even if your Event only has one activity, you’ll still need to log it as a Session.
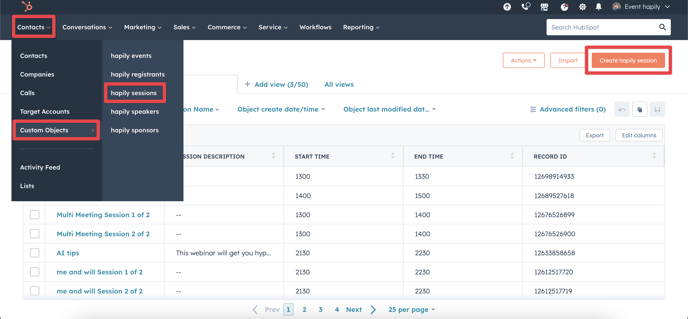
1. Click Contacts > Custom Objects > hapily sessions in the top bar.
2. Click the Create hapily session button.

3. Fill out the fields in the resulting tab.
Like with hapily events, only the Session Name field is required. But you can add additional info to the Session like a Description, Links, Addresses, etc.
Once you’ve created your hapily session, associate it with your hapily event! Create Sessions for each of your Event’s activities and you’re done!
Still have questions? Email us at care@hapily.com.
